Installing Passenger Enterprise + Apache on a Digital Ocean production server
for Ruby apps + generic installation through source tarball
On this page, we will install Passenger. After installing Passenger we can begin with deploying the app.
Table of contents
- Loading...
Installation
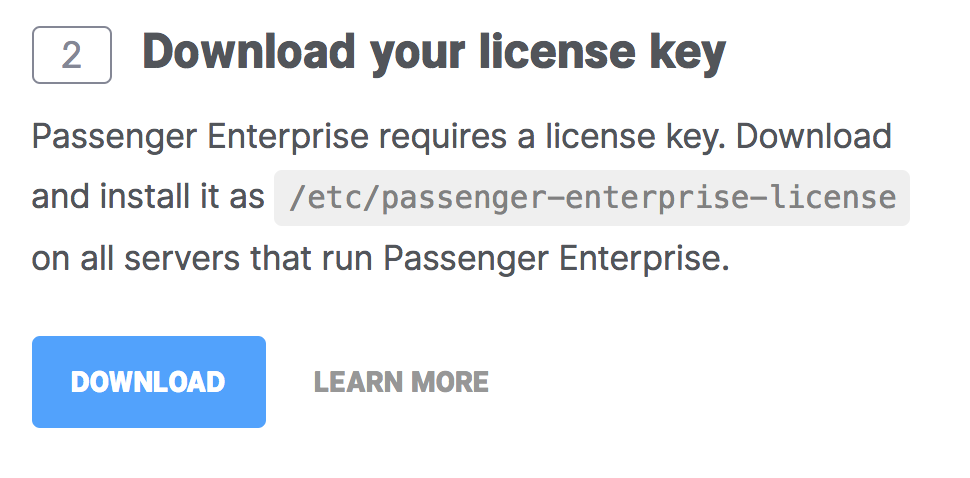
Step 1: download and install your license key
Before you can install Passenger Enterprise, you need to download and install your license key. This is a regular file that you need to copy to your production server.
Please login to the Passenger Enterprise Customer Area.
Click on the Install button in the Customer Area.

Click on the button to download the license key.
The license key will be downloaded to your local computer. Copy this license key file to your production server, for example using scp:
local-computer$ cd /path-to-your-local-computer-download-folder
local-computer$ scp passenger-enterprise-license adminuser@yourserver.com:
Replace adminuser with the name of an account with administrator privileges or sudo privileges.
Finally, login to your production server and save the file as /etc/passenger-enterprise-license:
local-computer$ ssh adminuser@yourserver.com
production-server$ sudo mv passenger-enterprise-license /etc/passenger-enterprise-license
production-server$ chmod 644 /etc/passenger-enterprise-license
Step 2: download tarball, upload to server and extract
Go to the "Files" section in the Customer Area and download the tar.gz file of the Passenger Enterprise version you want. Copy that file to your production server, for example using scp:
local-computer$ cd /path-to-your-local-computer-download-folder
local-computer$ scp passenger-enterprise-server-X.X.X.tar.gz admin@yourserver.com:
(Replace X.X.X with the Passenger Enterprise version)
On your production server, extract the tarball to some place permanent. Replace /somewhere-permanent with the actual directory path that you want to extract to. /opt is usually a good directory.
production-server$ tar -xzvf passenger-enterprise-server-X.X.X.tar.gz -C /somewhere-permanent
Step 3: install Ruby
Is Ruby already installed? Then skip to the next step.Passenger supports multiple languages and its core is written in C++, but its installer and administration tools are written in Ruby, so you must install Ruby.
Even though Ruby is required, Ruby will normally not be loaded during normal operation unless you deploy a Ruby web application on Passenger. Passenger's dependency on Ruby is very minimal. See Lightweight Ruby dependency for details.
| Debian, Ubuntu |
sudo apt-get update sudo apt-get install -y ruby rake |
|---|---|
| Red Hat, CentOS, Fedora, ScientificLinux, Amazon Linux |
Enable EPEL, then run as root:
yum install -y ruby rubygem-rake |
| Arch Linux |
sudo pacman -S ruby |
| macOS | No action needed. Ruby is installed by default. |
| Other operating systems | Install Ruby from the Ruby website. |
Step 4: add Passenger to PATH
Add the Passenger bin directory to your PATH, so that your shell can locate the Passenger commands.
Open your shell's system-wide startup file. If you're using bash, this is usually /etc/bashrc or /etc/bash.bashrc. Inside that file, add this to the end:
PATH=/somewhere-permanent/passenger-enterprise-server-X.X.X/bin:$PATH
export PATH
Again, replace X.X.X with the Passenger version, and /somewhere-permanent with the actual directory path.
When you're done, restart all your shells so that your new PATH takes effect.
useradd instead of adduser for example.
Step 5: run the Passenger Apache module installer
Run the Passenger Apache module installer and follow the on-screen instructions:
$ passenger-install-apache2-module
At the end of the installation process, you will be asked to copy and paste a configuration snippet (containing LoadModule, PassengerRoot, etc.) into your Apache configuration file.
Different operating systems and Apache installations have different conventions with regard to where the Apache configuration file is and how it is organized. Please read Working with the Apache configuration file if you are not familiar with it. That page is especially of interest for macOS Server >= 10.8 users because the configuration file may be at a surprising location.
Step 6: validate installation
After installation, please validate the install by running sudo passenger-config validate-install. For example:
$ sudo passenger-config validate-install
 * Checking whether this Phusion Passenger install is in PATH... ✓
 * Checking whether there are no other Phusion Passenger installations... ✓
All checks should pass. If any of the checks do not pass, please follow the suggestions on screen.
Finally, check whether Apache has started the Passenger core processes. Run sudo passenger-memory-stats. You should see Apache processes as well as Passenger processes. For example:
$ sudo passenger-memory-stats
Version: 5.0.8
Date   : 2015-05-28 08:46:20 +0200

---------- Apache processes ----------
PID    PPID   VMSize    Private  Name
--------------------------------------
3918   1      190.1 MB  0.1 MB   /usr/sbin/apache2
...

----- Passenger processes ------
PID    VMSize    Private   Name
--------------------------------
12517  83.2 MB   0.6 MB    Passenger watchdog
12520  266.0 MB  3.4 MB    Passenger core
12531  149.5 MB  1.4 MB    Passenger ust-router
...
If you do not see any Apache processes or Passenger processes, then you probably have some kind of installation problem or configuration problem. Please refer to the troubleshooting guide.
FAQ
How do I automate the downloading of the tarball?
You can use HTTP basic authentication.
In the Customer Area, right-click on the download button for the tarball and click "Copy link URL". That is the URL for the tarball. You can automate the download of that tarball by using download as the HTTP username and your download key as the HTTP password.
Here is an example using curl:
$ unset HISTFILE
$ VERSION=5.0.30 && curl --fail -L -o passenger-enterprise-server-${VERSION}.tar.gz -u download:YOUR_DOWNLOAD_KEY "https://www.phusionpassenger.com/orders/download?dir=${VERSION}&file=passenger-enterprise-server-${VERSION}.tar.gz"
Some of the dependent libraries are installed in non-standard locations. How do I allow the compiler to find them?
Please refer to Customizing the compilation process.
How do I pass additional flags to the compiler?
Please refer to Customizing the compilation process.
Next step
Now that you have installed Passenger, you are ready to deploy your Ruby application on the production server!